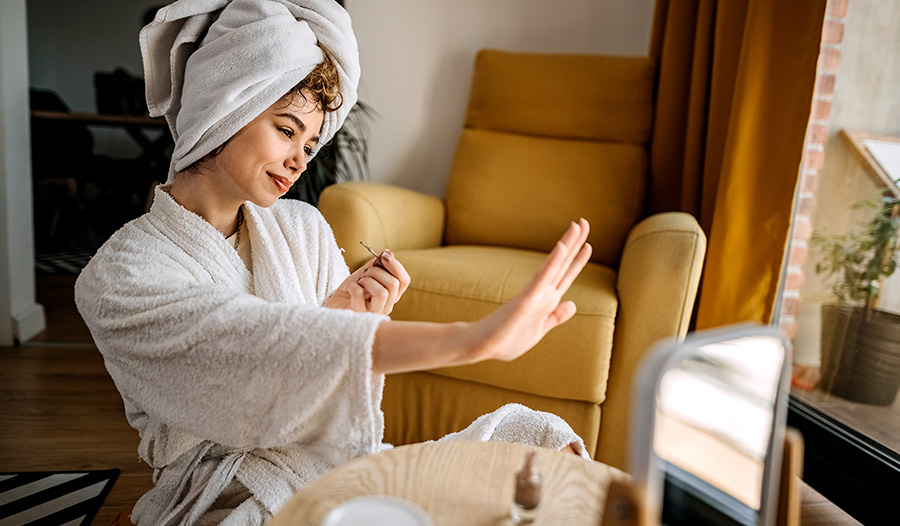
What if I told you I have a way for you to save money, time, and hassle, while simultaneously allowing your creative juices to flow freely?! Well, I do have a way, and it's to paint your nails at home! I know the idea of that (specifically painting your non-dominant hand) makes some cringe, but I promise you that with the right tools and a little practice, you'll have yourself wondering why you hadn't been giving yourself at-home manicures all along!
How to Give Yourself a Home Manicure
Step 1: Start with Clean Nails
Before all else, I ensure I start with clean nails because any product or residue left on your nail could cause products to not perform to their best ability. I accomplish this by using a good nail polish remover, and I have been really enjoying the Blossom Nail Polish Remover in the scent Lavender. Not only is it effective, but it’s pretty enough to have sitting out on your vanity!
Step 2: Trim and Clean Up Nails
For my next step, I will remove the dead skin around the edges of my nails and clip any nails that can’t be shaped with only a nail file. For this step, products like Revlon Nail Clipper and Revlon Cuticle Nipper give me the best results.
Step 3: Use Cuticle Remover
A step that I recently added to my routine was removing my cuticles. A few months ago, I didn’t even know a product like that existed, and now my routine isn’t complete without it! I have been using the Nutra Nail Natural Cuticle Remover, which has worked very well.
Once applied, you are instructed to leave the cuticle remover on for a period of time before commencing with a pusher or manicure stick. And this Denco Cuticle Pusher is super high quality.
Step 4: File and Buff for Shape and Smoothness
To prepare the nails themselves for paint (whether a clear coat or a neon green glitter nail polish), I use a nail buffer, and this Revlon Shape-N-Buff Nail Buffer is my favorite one I’ve used in a long time. It gives you everything you need to shape, even out, smooth, buff, and shine in a space-saving way! If you are in need of a separate file, glass files are beautiful and functional.
Step 5: Clean Up With A Nail Brush
After filing and buffing, you will likely have debris to clean up, and I have found that nail brushes are a perfect way of getting rid of all that dust. Scrub your dry nails lightly with it, then rinse your hands with water.
Step 6: Apply Base Coat
Once the skin around your nails, your cuticles, and your nails themselves have been prepped, it’s finally time to paint! Trust me, the added longevity you will get from your manicure will make it well worth the additional effort! For me, when doing my fingernails at home, I always start with a base coat. A base coat gives something for the color to stick onto, and it will prevent the possible staining of your natural nail due to the pigment in the nail polish you choose to use. The Probelle Nail Strengthener Base Coat is not only great for use underneath colored nail polishes, but it will also work to strengthen your nails at the same time.
Step 7: Time to Paint!
If you choose to add color to your nails and not just keep them free of anything or just clear, this is the step in which you would do so. Unfortunately, this is where most people decide that at-home manicures aren’t for them. However, I am here to tell all of you that, whether you have short nails, long nails, have a hard time doing anything with your non-dominant hand, or any of the other many excuses I have heard, you can absolutely master this skill! If you are new to painting your nails with color at home, I suggest starting with a light shade. Dark colors will show mistakes more, so if you’re messy, it will show less and be easier to clean up if you start that way.
Another tip I learned long ago that started me on the path of making my at-home manicures look like they were done in a nail salon was not to try and get the polish all the way to the bottom of the nail. The chance that you could do that without experiencing any pooling of the excess nail polish or accidentally painting your skin is so small that it is just best to avoid that temptation. Instead, stay slightly off the base of the nail. Yes, you will see some bare nail, but it will be nearly impossible to see. That way, you can get a much cleaner line and will have less clean-up. This method also works well when talking about the sides of your nails. If you attempt to get as close as possible to the edge of your nail, you will likely get nail polish on your skin, and if you’re in a hurry and don’t have time to clean that up, you may be like me and worry about it all day!
Keeping a very small space in-between where your nail ends, and the nail polish begins is a nearly fail-safe plan. Finally, when it comes to coating the rest of your nail, it works best for me to place the brush in the middle of the nail, near but not at the base, and brush up. Then, not taking any more polish from the bottle, spread that polish out to the other sides – brushing up from near the base to the right and then near the base to the left. My suggestion is thin layers with multiple coats (usually two (2) should suffice if you’re using high-quality nail polishes) rather than one (1) thick coat.
Step 8: Seal with a Top Coat
If you have experienced problems with chipping and dullness when painting your own nails in the past, it may be because you weren’t wearing a top coat! Regarding top coats, with how busy we all are, I suggest one that will dry them faster than a traditional top coat or skipping out on a top coat altogether. The Probelle Top Coat Sealer will give you that, plus a lot of shine and fewer chips.
Step 9 (and ongoing): Maintain Your Nails with Cuticle Oil and Growth Serum
My favorite step in the process is the last one, of course! It means you have put in the tedious work to increase your nail polish's wear time (if you wear nail polish), and it’s time to reap the rewards! As a final step and something I will apply as needed in the following days, I use a cuticle oil or balm. This will keep the skin around my nails looking hydrated and, in turn, will reduce the chance of dry, cracking skin.
The Badger Company Organic Cuticle Care in Soothing Shea Butter has really been impressing me.
I also have a hard time growing long, strong nails, so after reading the reviews for the Sally Hansen NailGrowth Miracle Serum, I knew I had to test it out!
Other Tips for a Long-Lasting At-Home Manicure
If you’re terrible at painting your nails and don’t think you’ll get any better anytime soon (although I’d argue that everyone can get better if they dedicate time and energy to it!), might I suggest press-on nails?!
The Ardell Nail Addict Premium in Nude Jeweled nails are easy to apply, can last a couple of weeks with proper preparation and care, and look amazing! If you love this idea but not this particular set, you’re in luck because Ardell has several other options.
One final recommendation I have that I learned from an influencer called Simply Nailogical is never to shower, bathe, go swimming, etc. when your nails are bare! As you have probably noticed, your nails normally feel weaker after being submerged in water for a period of time, and the only thing to help combat that is to have some type of coating on your nails. Even if you don’t have the time to do the full 9-step process I listed above, always just take a few minutes to throw a clear coat on to protect them from getting water-logged!
Now, go out into the world with the money you saved skipping the nail salon, and show off your manicure skills to all your friends and family. Before you know it, you’ll be a pro, and they’ll be asking you for tips! And of course, just have fun with it: If you mess up, that’s what nail polish remover is for!

 By Katie Silseth